Creating a Blog - 11. Adding View Count to Posts
Blog Creation Series
| Title | Link |
|---|---|
| 1. Basic Setup | https://witch.work/posts/blog-remake-1 |
| 2. HTML Design for Main Page | https://witch.work/posts/blog-remake-2 |
| 3. Structure Design for Post Detail Page | https://witch.work/posts/blog-remake-3 |
| 4. Enabling Relative Paths for Images | https://witch.work/posts/blog-remake-4 |
| 5. Minor Page Composition Improvements and Deployment | https://witch.work/posts/blog-remake-5 |
| 6. Layout Design for Page Elements | https://witch.work/posts/blog-remake-6 |
| 7. Main Page Component Design | https://witch.work/posts/blog-remake-7 |
| 8. Design for Post List/Content Page Components | https://witch.work/posts/blog-remake-8 |
| 9. Automatic Generation of Post Thumbnails | https://witch.work/posts/blog-remake-9 |
| 10. Design Improvements for Fonts, Cards, etc. | https://witch.work/posts/blog-remake-10 |
| 11. Adding View Count to Posts | https://witch.work/posts/blog-remake-11 |
| 12. Page Theme and Post Search Functionality | https://witch.work/posts/blog-remake-12 |
| 13. Improvements to Theme Icons and Thumbnail Layouts | https://witch.work/posts/blog-remake-13 |
| 14. Changing Post Categorization to Tag-Based | https://witch.work/posts/blog-remake-14 |
| Optimizing Calculations on Main Page | https://witch.work/posts/blog-opt-1 |
| Creating Pagination for Post List | https://witch.work/posts/blog-opt-2 |
| Uploading Images to CDN and Creating Placeholders | https://witch.work/posts/blog-opt-3 |
| Implementing Infinite Scroll on Search Page | https://witch.work/posts/blog-opt-4 |
This post details the process of adding view counts to my new blog. I used some excerpts from the previous incomplete work on adding view counts for informational purposes.
In fact, if I had used Vercel, it would have been much easier to handle everything, but trying to do it on Cloudflare was extremely challenging. Eventually, I had to redeploy to Vercel.
There were numerous challenges and failures. If anyone wishes to deploy a NextJS app on Cloudflare Pages and add view counts... let’s hope Cloudflare Pages supports NodeJS runtime or properly supports SWR in the edge runtime.
However, reviewing the issues, the former appears to have no promise at all (it seems to be trying to run results built on Vercel on Cloudflare, which uses different underlying technologies) and the latter does not seem to be in particular plans. If anyone has succeeded, I would appreciate it if you could share your experience.
1. Moving Posts
First, I moved all the posts to the new blog. After moving, the build took much longer.
2. Busuanzi
There is a Chinese service called Busuanzi, which allows for easy addition of view counts to pages and blogs. This section includes excerpts from an older post of mine.
Following Fienestar's guide, with a few modifications to fit my blog.
First, add the following code to the site's head or body.
<script async src="//busuanzi.ibruce.info/busuanzi/2.3/busuanzi.pure.mini.js"></script>
My blog has a Seo component that is included on all pages. This Seo component is composed of the Helmet component from react-helmet, which manages the content in the head tag. (Note: In Next.js, you'll likely need to add this script via a Script tag in the Head component).
Thus, add the code in between the Helmet component.
<Helmet
// SEO metadata goes here.
// Skipping it as it is not important.
>
  <script async src='//busuanzi.ibruce.info/busuanzi/2.3/busuanzi.pure.mini.js'></script>
</Helmet>
2.1. Total Site Views and Unique Visitors
Total site views and unique visitors can be added with the following code. The id in the span is important.
<section style={{ height: '20px' }}>
  Total Views: <span id='busuanzi_value_site_pv'></span> times <br />
  Unique Visitors: <span id='busuanzi_value_site_uv'></span> people
</section>
This code needs to be added to the blog's page. In my blog, I added it right below my profile in the BlogIndex component, which represents the main page.
While struggling with this view count display, I thought a lot about restructuring the blog, hence I didn’t style it right away.
2.2. Page Views
The view count for a single page can be added with the following code.
<span id="busuanzi_value_page_pv"></span>
This has been suitably added just below the post title.
I’ll document other struggles below. I hope this knowledge will assist when I overhaul the blog in the future.
Remarkably, just two months later, I am rewriting this post. This time it’s in Next.js, hence the rewrite.
3. Google Analytics - Registration
3.1. Creating an Account
Let's create a new Google Analytics account.

Also, set up the website property.

After inputting the business information, agree to the terms, and finish creating the account.
3.2. Migrating the Blog
Now that my blog is getting structured, let’s connect my witch.work domain to the new blog.
Currently, it’s connected to the blog page I created with Gatsby.
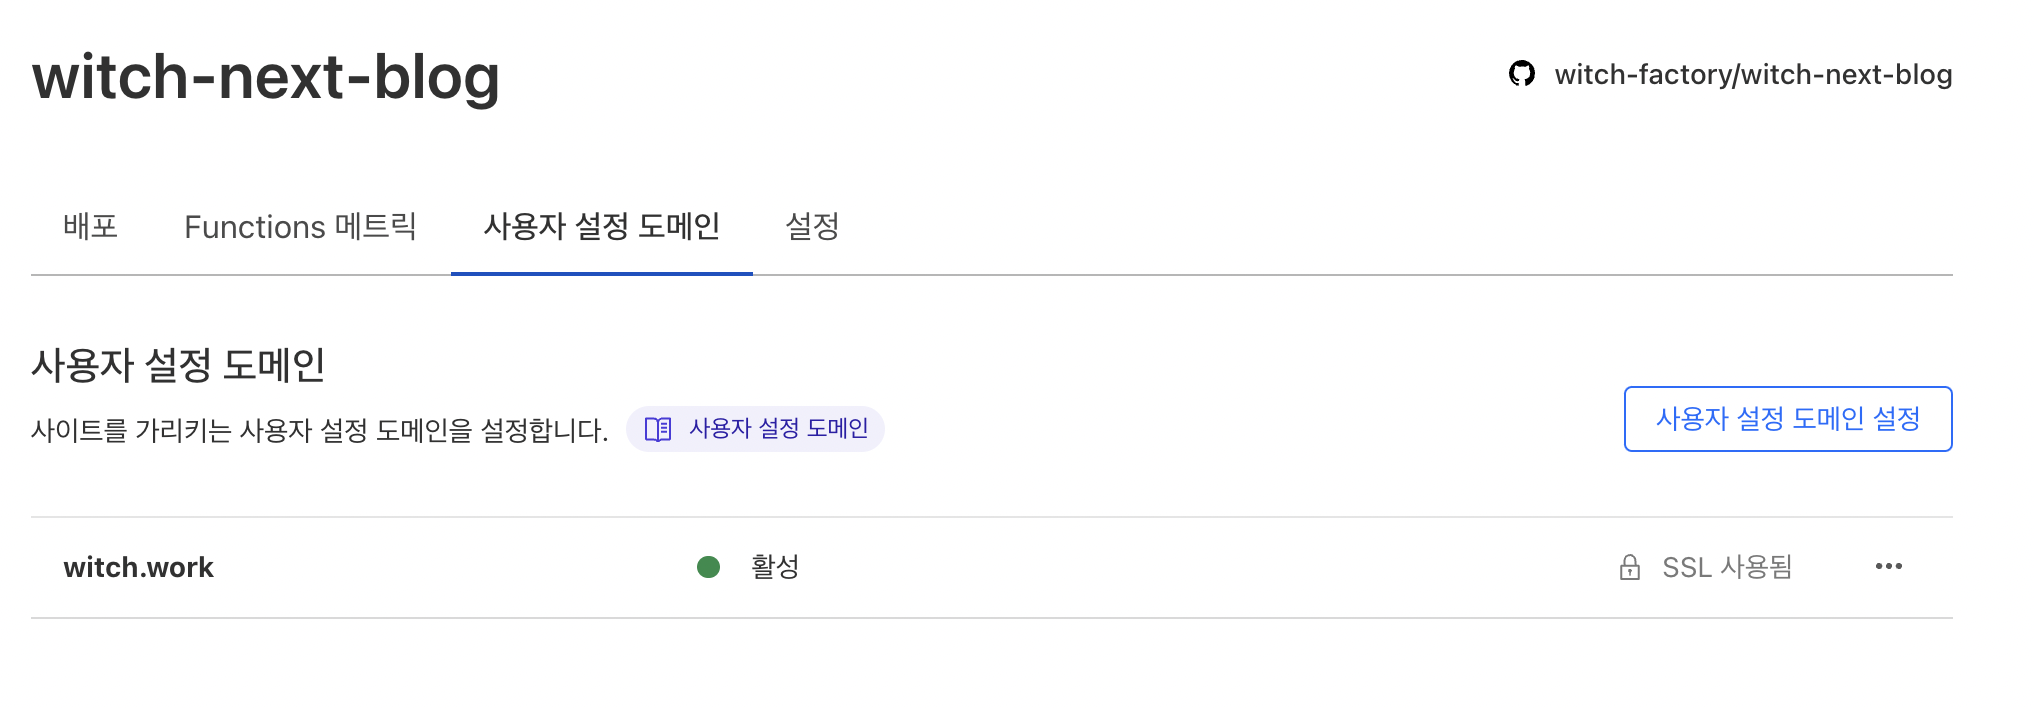
Access the Cloudflare Pages menu as follows.
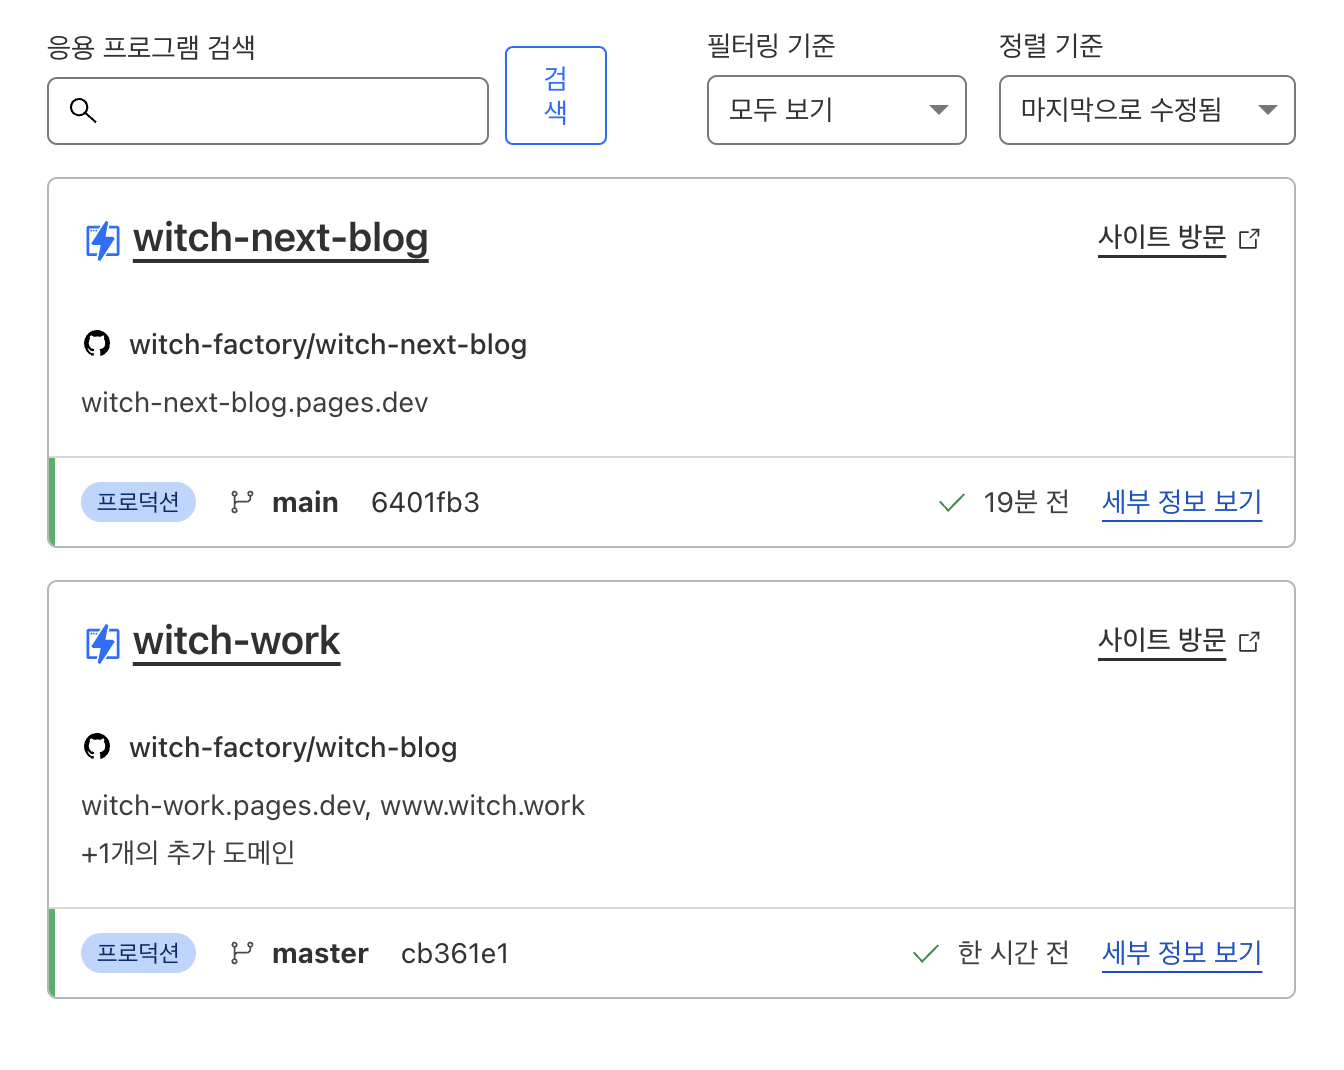
Then enter the project you were previously using and delete the custom domain menu for witch.work.
Add witch.work in the custom domain for witch-next-blog.
3.3. Adding Data Stream and Tags
Next, enter the data stream menu and add a stream for the page.
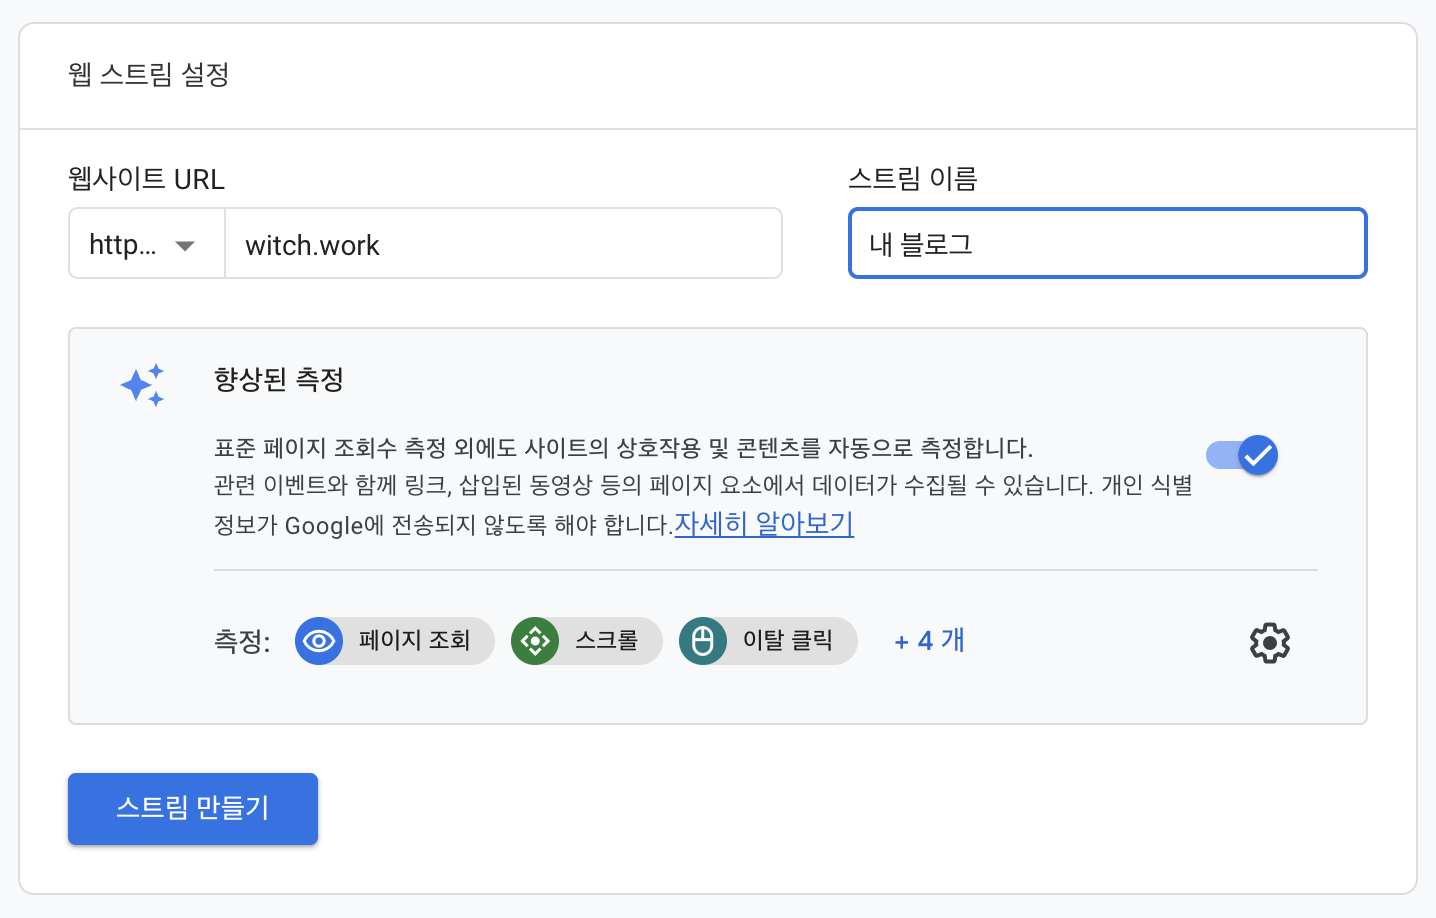
However, I see a warning stating that data collection has not been activated.

3.4. Setting the Tracking Code
To activate data collection, we need to register the Measurement ID obtained earlier. Let’s set the GA tracking code. Here, I received help from the front-end guru Lee Chang-Hee and Kim Min-Ji's blog.
Add the Google Analytics ID to blog-config.ts. It should be written as follows. The GA tracking code is the code that starts with G- found in Google Analytics.
Since this does not pose a security issue by being included in the git repo, it’s fine to write it in this file.
// blog-config.ts
const blogConfig: BlogConfigType = {
  name: 'Sung Hyun Kim',
  title: 'Witch-Work',
  description: 'I am not a person with outstanding ambitions. I’ve just followed the light emitted by remarkable people and arrived here, hoping to continue living that way. I feel honored to be able to share this place with you.',
  picture: '/witch.jpeg',
  url: 'https://witch-next-blog.vercel.app',
  social: {
    Github: 'https://github.com/witch-factory',
    BOJ: 'https://www.acmicpc.net/user/city'
  },
  thumbnail: '/witch.jpeg',
  googleAnalyticsId: 'G-XXXXXXXXXX' // This section should use your GA tracking code
};
Then create a script component for GA tracking. I took inspiration from ambienxo.
The script that inserts the GA tracking code is simply wrapped with next/script. Create src/components/GoogleAnalytics.tsx and write the following.
// src/components/GoogleAnalytics.tsx
import Script from 'next/script';

import blogConfig from '../../blog-config';

const GoogleAnalytics = () => {
  if (blogConfig.googleAnalyticsId == null) {
    return null;
  }
  return (
    <>
      <Script
        src={`https://www.googletagmanager.com/gtag/js?id=${blogConfig.googleAnalyticsId}`}
        strategy='afterInteractive'
      />
      <Script id='google-analytics' strategy='afterInteractive'>
        {`
          window.dataLayer = window.dataLayer || [];
          function gtag(){window.dataLayer.push(arguments);}
          gtag('js', new Date());

          gtag('config', '${blogConfig.googleAnalyticsId}');
        `}
      </Script>
    </>
  );
};

export default GoogleAnalytics;
Then add this component to _app.tsx. It should be introduced here as it applies to all pages.
// _app.tsx
export default function App({ Component, pageProps }: AppProps) {
  return (
    <>
      <Head>
        <meta name='viewport' content='width=device-width, initial-scale=1' />
        <link rel='manifest' href='/site.webmanifest' />
      </Head>
      <DefaultSeo {...SEOConfig} />
      <Header navList={blogCategoryList} />
      <Component {...pageProps} />
      <Footer />
      {/* Add it here */}
      <GoogleAnalytics />
    </>
  );
}
For those who wish to track view counts, please refer to this post. I failed due to the Cloudflare environment...
4. Attempting to Measure Views Using FirebaseDB
Referring to Real-time Blog View Count with NextJS and Firebase and a similar post, I attempted to measure view counts using a database.
In particular, using Google Analytics for view counts might lead to approximately 10% of counts being missed due to ad blockers. This is especially true for technology-related blogs, where most readers seem to use ad blockers.
4.1. Create a Firebase Project
Log into Firebase and go to the console. I logged in with my Google account. Then click 'Go to Console' in the top menu.
A screen will appear to create a project, so proceed to create a project.

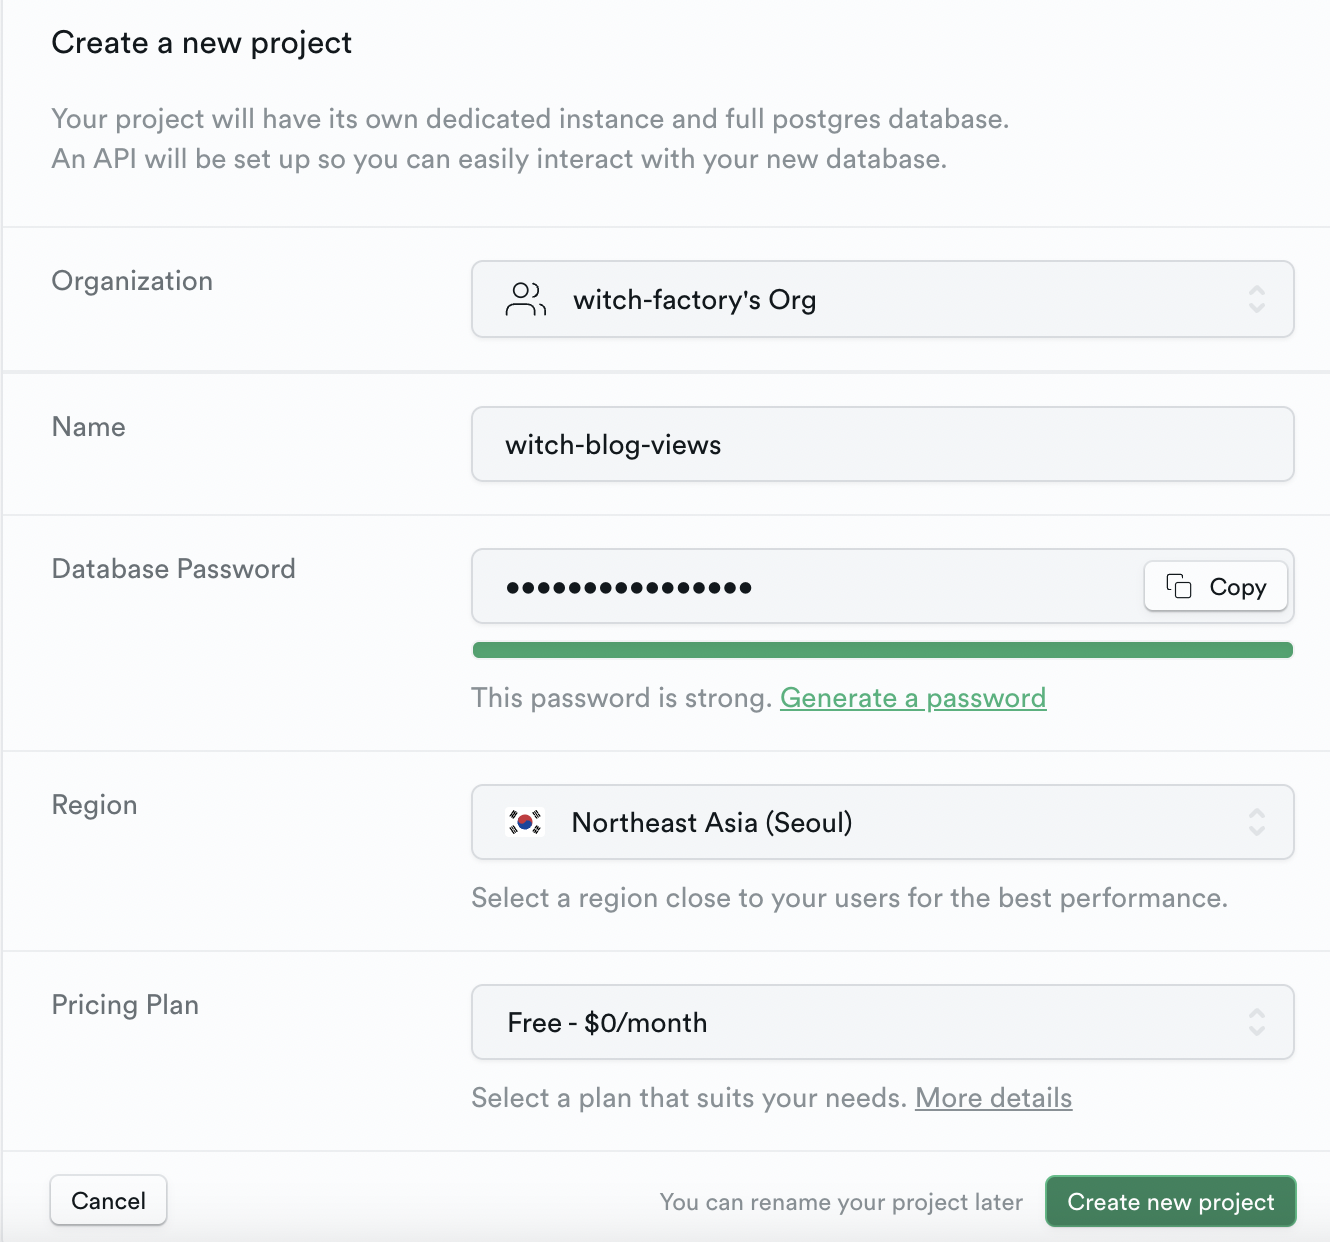
I created a project named witch-blog-views. Although I could attach Google Analytics, I already had an account made previously.
4.2. Create the Database
Once your project is created, create a database. From the build category in the left menu, select Realtime Database.

On the resulting page, click Create Database. Select a database located in the US and start in test mode.
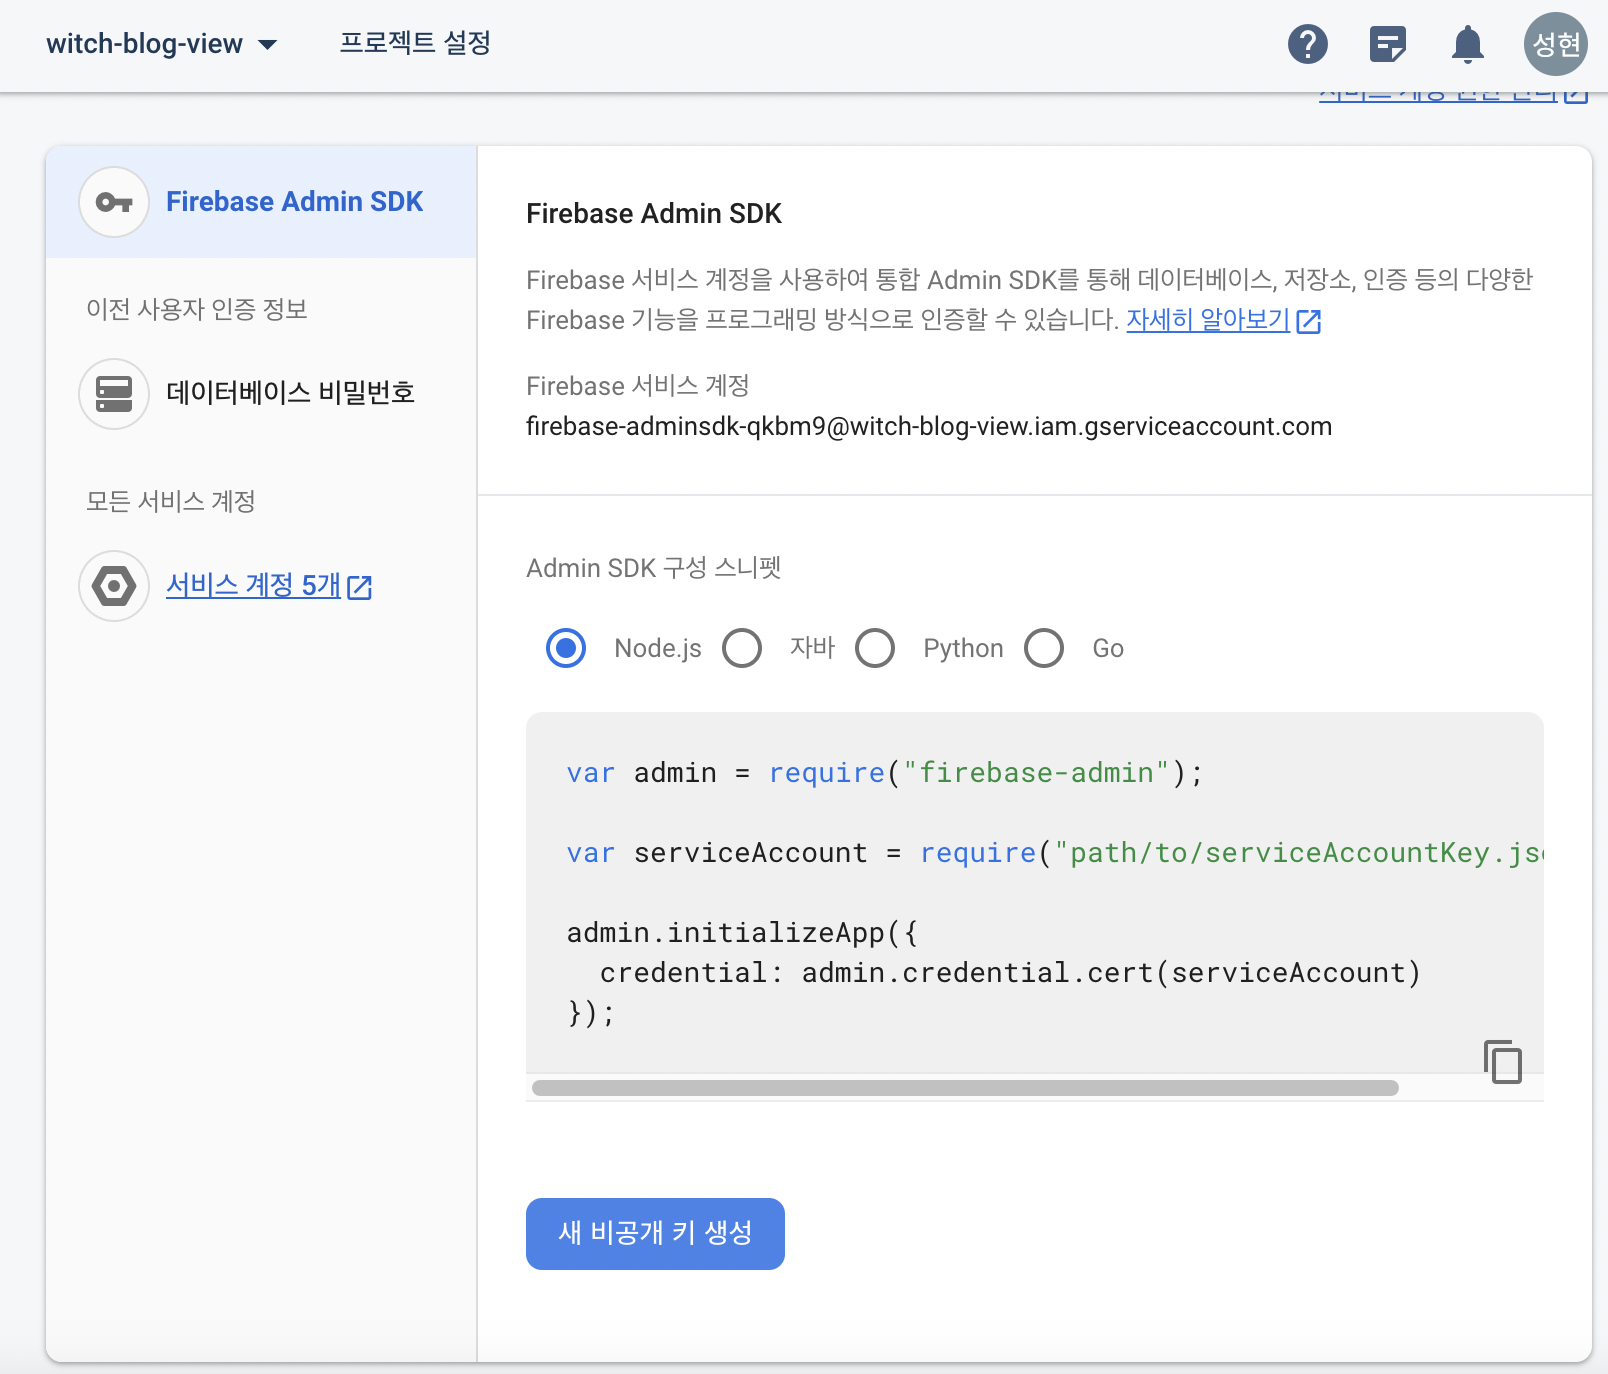
Then, click the gear icon next to 'Project Overview' in the upper left menu to go to project settings. Navigate to the Service accounts tab.
Click Generate new private key and save the resulting json file securely.
4.3. Connect the Database
Now, let’s connect to the database. Install firebase-admin.
npm i firebase-admin
Then create a .env.local file and add it to .gitignore, writing the following content.
NEXT_PUBLIC_FIREBASE_PROJECT_ID=replace-me
FIREBASE_CLIENT_EMAIL=replace-me
FIREBASE_PRIVATE_KEY="replace-me"
This information can be found in the downloaded json file by looking for similarly-named keywords. The PRIVATE_KEY value must be quoted.
Next, create src/lib/firebase.js and write the following code to initialize the app and establish the connection.
import * as admin from 'firebase-admin';

if (!admin.apps.length) {
  admin.initializeApp({
    credential: admin.credential.cert({
      projectId: process.env.NEXT_PUBLIC_FIREBASE_PROJECT_ID,
      clientEmail: process.env.FIREBASE_CLIENT_EMAIL,
      privateKey: process.env.FIREBASE_PRIVATE_KEY.replace(/\\n/g, '\n'),
    }),
  });
}

const db = admin.firestore();

export { db };
Now that we have established a connection with the database, we need to create a function in the API route that accesses the database to increment the view count for each HTTP request. I borrowed some ideas from this. Create api/views/[slug].js and write the following.
import db from '@/lib/firebase'

export default async (req, res) => {
  // increment the views
  if (req.method === 'POST') {
    const ref = db.ref('views').child(req.query.slug)
    const { snapshot } = await ref.transaction((currentViews) => {
      if (currentViews === null) {
        return 1
      }
      return currentViews + 1
    })

    return res.status(200).json({
      total: snapshot.val(),
    })
  }

  // fetch the views
  if (req.method === 'GET') {
    const snapshot = await db.ref('views').child(req.query.slug).once('value')
    const views = snapshot.val()

    return res.status(200).json({ total: views })
  }
}
Run in development mode with npm run dev. By sending a POST request to the /api/views/this-is-blog-slug address, you can verify that the view increases in the Firebase Realtime Database. I used Postman for the POST request, but any other method would work too.
4.4. Cloudflare Environment Issues
Now, let’s build it on Cloudflare. Note that you can also run it locally as it would behave on Cloudflare by executing the following commands.
npx @cloudflare/next-on-pages
# Run this command in a different terminal to execute the built results on local host.
npx wrangler pages dev .vercel/output/static --compatibility-flag=nodejs_compat
However, once I build it, I immediately get an error.
The following functions were not configured to run with the Edge Runtime:
⚡️ 		- api/views/[slug].func
Afterward, I keep encountering errors indicating that the runtime needs to be set to Edge. This is because NextJS's SSR uses Node.js runtime by default, which is not supported on Cloudflare Pages.
Thus, add the following line to api/views/[slug].js.
export const runtime = 'edge';
Now, a different error appears.
Dynamic Code Evaluation (e.g., 'eval', 'new Function', 'WebAssembly.compile') not allowed in Edge Runtime
This strongly suggests that something unsupported in edge runtime is being used. There was a related GitHub issue stating that firebase-admin requires full Node.js runtime, which is currently unsupported in Cloudflare workers.
Although a replacement package has been provided, it’s too difficult to implement, so I give up on this approach.
If anyone wants to use this method to add view counts, consider using this post as a reference to create a component that fetches view count data with SWR. But yet again, Cloudflare hindered me, so I will try a new method.
5. Measuring View Counts with Supabase
I decided to utilize Supabase, an open-source alternative to Firebase, which also supports edge functions.
5.1. Designing the View Count Counter
After much deliberation, let’s consider what is required for a view count counter when measuring views with a database. The features of the view count counter might include the following:
- When the page loads, it fetches and displays the page views from the serverless database.
- When the page loads, it increments the respective page view counter in the database.
This process should be done separately for each post. Thus, each entity in the database should contain the post title (as the post title is written in Korean, it will be used as the folder name containing the post) and its respective view count. The title should act as the primary key.
Communication with the database will use the API routes provided by Next.js, and the SWR library will be used to fetch the API route information. For a reference on how to use SWR with Next.js, check here.
Let’s attempt to set up the API route for fetching view counts.
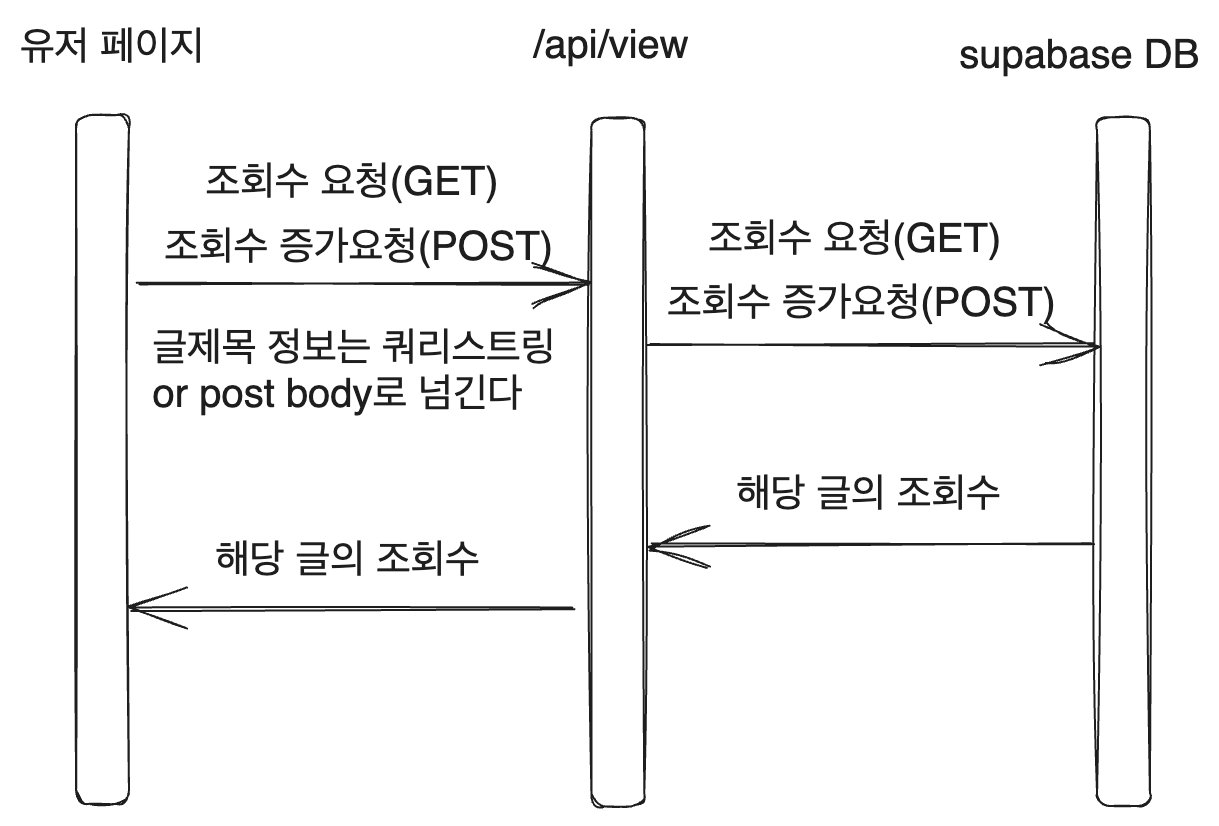
Although the database can be edited directly (as Supabase DB is easily editable through the web), this doesn’t undermine the importance of the tracking itself, so I believe this is sufficient.
5.2. Create a Supabase Project
First, I’ll create a Supabase project. Visit Supabase, log in with GitHub, and create a new project. The official documentation provides a friendly explanation of using Supabase with Next.js.
In the Project Page, create a new project. From my observations of the pricing policy, it seems to be more favorable than Firebase’s free policy. It’s reminiscent of Cloudflare Pages being more advantageous than Vercel for deployments... Anyway, fill in the information and create the project, selecting a region in Korea.
Next, let’s create a table. In the SQL Editor, select your project and click Create table. Then enter the SQL below to create the views table, with the slug as the primary key and adding an integer for the view count and a timestamp indicating when the view count was recorded.
The int4 used in the view count is a 4-byte integer in Supabase. Using int2 allows storage up to 32,767 but I used int4 hoping that my posts would exceed 2^15 views someday. Who knows, perhaps the blog would see over 2 billion views.
create table views (
  slug text primary key,
  created_at timestamp with time zone default timezone('utc'::text, now()) not null,
  view_count int4
);
Next, I'll add a function to increase the view count using SQL.
create function increment (slug_text text)
returns void as
$$
update views
set view_count = view_count + 1
where slug = slug_text;
$$
language sql volatile;
Initialize the Supabase JavaScript client with the following command:
npm install @supabase/supabase-js
Then, write the following contents into the .env.local file, replacing replace-me with my project's URL and anon key. The project name and anon key can be found here.
SUPABASE_URL=replace-me
SUPABASE_KEY=replace-me
Next, create src/lib/supabaseClient.js with the following code.
import { createClient } from '@supabase/supabase-js';

export const supabase = createClient(
  process.env.SUPABASE_URL,
  process.env.SUPABASE_KEY
);
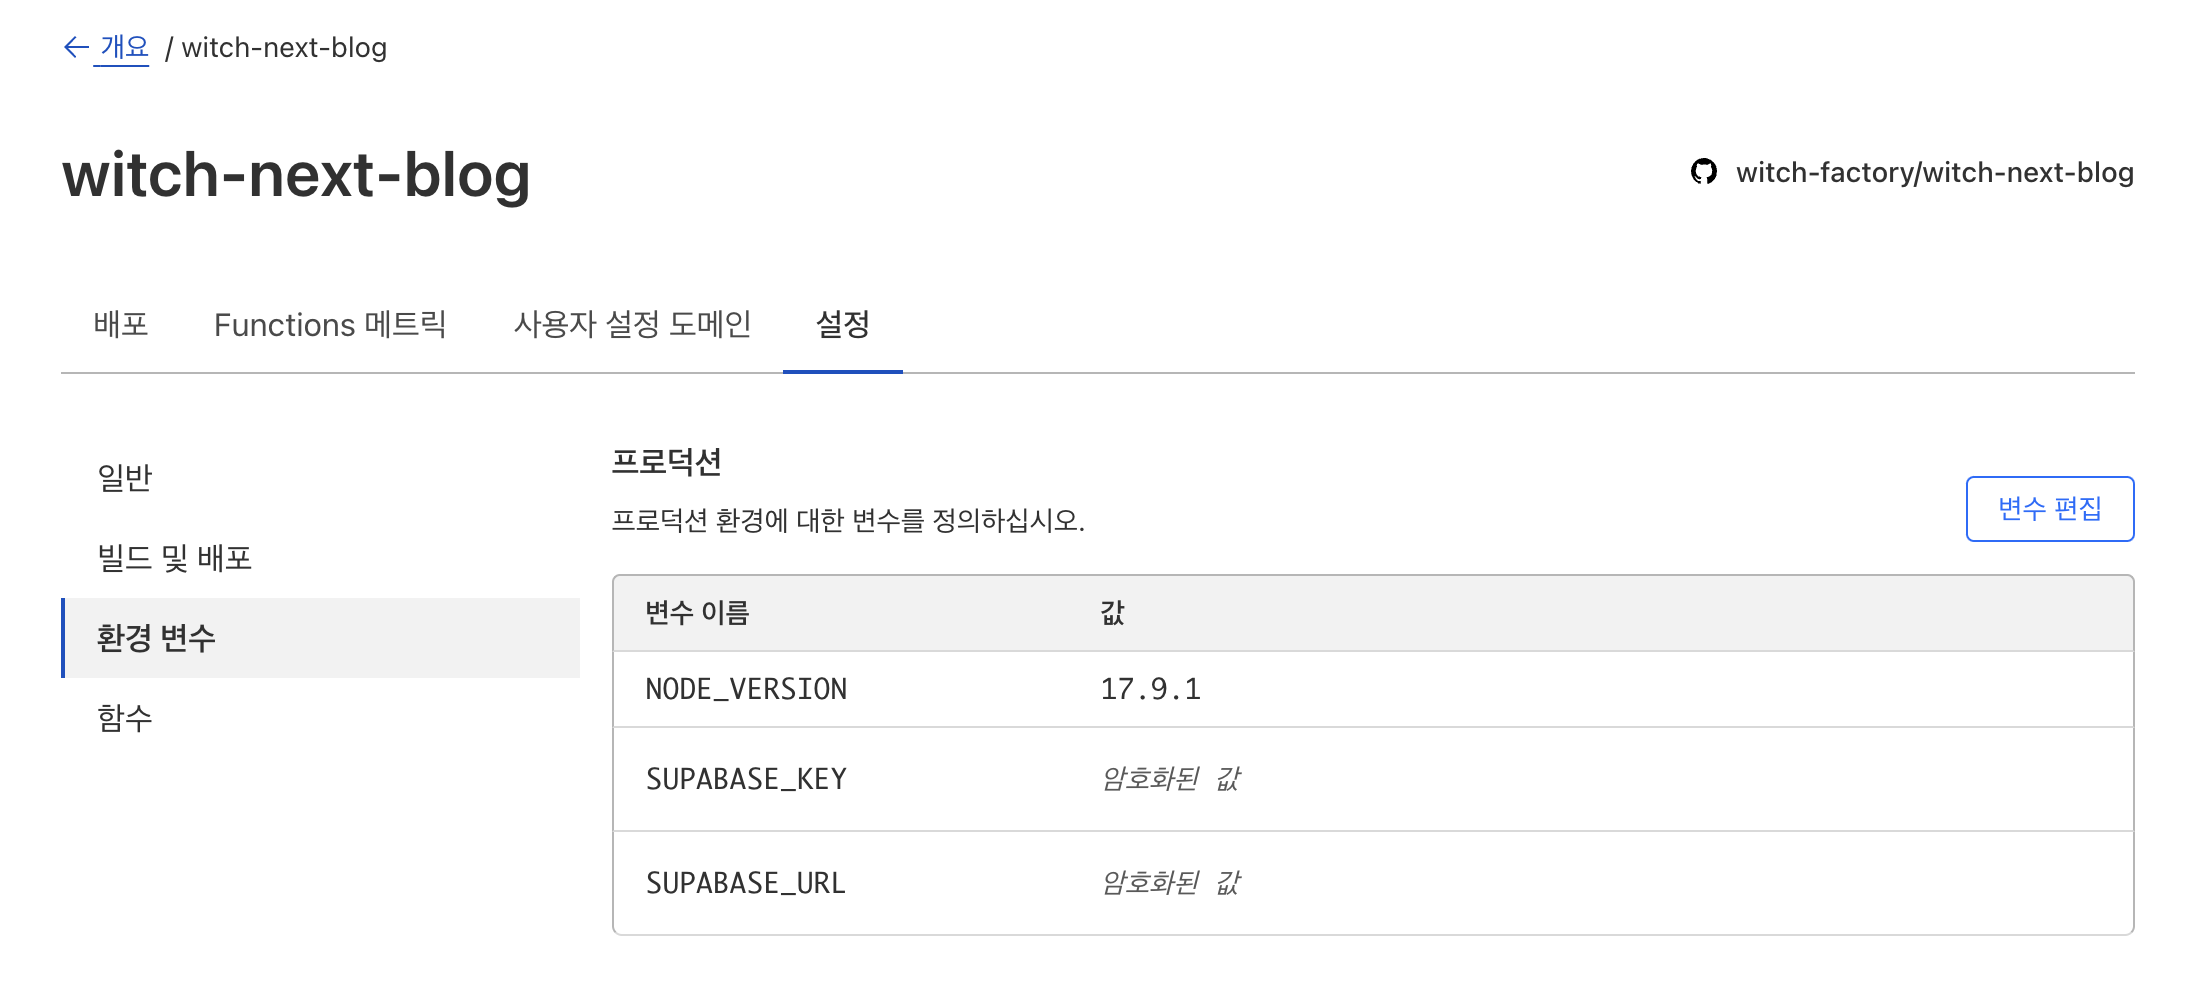
Then add these environment variables to the Cloudflare Pages settings. Select the project you created under Workers and Pages, then add the SUPABASE_URL and SUPABASE_KEY in the Settings - Environment Variables menu.
5.3. Fetching View Count
Let’s create an API route to fetch view counts. Although one might think of creating api/views/[slug].js, there’s no such structure in the Cloudflare Pages deployment environment.
Cloudflare Pages supports only edge runtime for server components, which means all API routes will be treated as API endpoints rather than page routes. Therefore, dynamic API routes won't work. However, it is still necessary to fetch the data from the API routes, so let’s find a way to do this.
Testing one command to build in the Cloudflare environment step by step as follows:
# Command to test in the Cloudflare Pages build environment
npx @cloudflare/next-on-pages
npx wrangler pages dev .vercel/output/static --compatibility-flag=nodejs_compat
We will use the supabase object defined in src/lib/supabaseClient.js to create a function that fetches view counts. I managed to create it while referring to the official documentation. This will return the view_count from the views table, fetching only the row where the slug matches the function argument and using single to retrieve a single object as a response.
Since the slug acts as a primary key, the return value will either be none or one row, making the use of single appropriate.
// src/lib/supabaseClient.js
export async function getViewCount(slug) {
  const {data, error}=await supabase.from('views').select('view_count').eq('slug', slug).single();
  return data;
}
However, as mentioned earlier, dynamic API routes cannot be used in edge runtime. How will we pass the slug? By utilizing a query string in the GET request, as slugs are not particularly sensitive information.
We can then create api/view/index.ts and write the following.
// Active in edge runtime
export const runtime = 'edge';

import type { NextRequest } from 'next/server';

import { getViewCount } from '../../../lib/supabaseClient';

export default async function handler(
  req: NextRequest,
) {
  /* Extract the slug from the query string.
  Therefore, the query string should be written as ?slug=my-post-slug */
  const { searchParams } = new URL(req.url);
  const slug = searchParams.get('slug');

  /* In case slug is absent in the query string */
  if (!slug) {
    return new Response(
      'invalid slug in query string',
      {
        status: 400,
        headers: {
          'content-type': 'application/json',
        },
      }
    );
  }

  /* Fetch the view_count object using the slug from the query string.
  The return value should be {view_count : view_count_value} if a row matching the slug exists. */
  const data = await getViewCount(slug);

  return new Response(
    data?.view_count || 0,
    {
      status: 200,
      headers: {
        'content-type': 'application/json',
      },
    }
  );
}
How to test this function? I used the /about route for experimentation. I proceeded to create a component like this...
function View({slug}: {slug: string}) {
  const {data}=useSWR(`/api/view?slug=${slug}`);
  return <div>{`View Count: ${JSON.stringify(data)}`}</div>;
}
This is merely an intermediate iteration, hence I'll skip detailed explanations. Just experiment progressively using an unused route. The integration between SWR and Next.js can be referenced here.
5.4. Handling Errors in View Count Fetching
However, if a new user accesses a post whose view count doesn't yet exist, an error will arise. If the row corresponding to the slug does not exist, this will yield an error scenario. In testing, this resulted in data being returned as null. Let’s resolve this issue.
We’ll create a function that attempts getViewCount, and if an error occurs due to zero rows, it will insert the view count row for that slug.
The getViewCount should return both data and error.
// src/lib/supabaseClient.js
async function getViewCount(slug) {
  const {data, error} = await supabase
    .from('views')
    .select('view_count')
    .eq('slug', slug)
    .single();

  return {data, error};
}
Next, we create a function called registerViewCount that inserts a new row for a slug if it does not exist.
// src/lib/supabaseClient.js
export async function registerViewCount(slug) {
  await supabase
    .from('views')
    .insert({slug, view_count:1});
}
Now, let’s implement the fetchViewCount function that utilizes these functionalities.
// src/lib/supabaseClient.js
// Receives a slug and returns the view count for that slug
export async function fetchViewCount(slug) {
  const {data, error} = await getViewCount(slug);

  // If there is no row for the provided slug
  if (error) {
    if (error.details.includes('0 rows')) {
      /* Insert a new row */
      await registerViewCount(slug);
      const {data:newData, error:newError} = await getViewCount(slug);
      if (newError) {
        /* Handle error if it still occurs */
        return {data:null, error:newError};
      }
      else {
        return {data:newData, error:null};
      }
    }
    else {
      /* Handle other errors */
      return {data:null, error};
    }
  }
  return {data, error};
}
This function will then replace the former fetchViewCount.
// api/view/index.ts
import { fetchViewCount } from '../../../lib/supabaseClient';

export default async function handler(
  req: NextRequest,
) {
  const { searchParams } = new URL(req.url);
  const slug = searchParams.get('slug');
  if (!slug) {
    return new Response(
      'invalid slug in query string',
      {
        status: 400,
        headers: {
          'content-type': 'application/json',
        },
      }
    );
  }

  // Updated to use fetchViewCount
  const {data, error}=await fetchViewCount(slug);

  if (error) {
    return new Response(
      null,
      {
        status: 500,
        headers: {
          'content-type': 'application/json',
        },
      }
    );
  }

  return new Response(
    data?.view_count || 0,
    {
      status: 200,
      headers: {
        'content-type': 'application/json',
      },
    }
  );
}
Now, let’s create a component within src/pages/posts/[category]/[slug]/index.tsx to fetch the view count. This component will utilize useSWR for data fetching.
The fetch will involve adding an appropriate query string to api/view.
// src/pages/posts/[category]/[slug]/index.tsx
function ViewCounter({slug}: {slug: string}) {
  const {data}=useSWR(`/api/view?slug=${slug}`);
  return <div>{`View Count: ${data} times`}</div>;
}
To pre-fetch initial data into all SWR hooks, we use the fallback option of SWRConfig in getStaticProps.
// src/pages/posts/[category]/[slug]/index.tsx
export const getStaticProps: GetStaticProps = async ({params}) => {
  const post = getSortedPosts().find(
    (p: DocumentTypes) => {
      const temp = p._raw.flattenedPath.split('/');
      return temp[0] === params?.category && temp[1] === params?.slug;
    }
  )!;

  const {data} = await fetchViewCount(params?.slug);
  const fallback = {
    [`/api/view?slug=${params?.slug}`]: data?.view_count,
  };

  return {
    props: {
      post,
      fallback
    },
  };
};
Wrap the ViewCounter component in SWRConfig, passing the fallback object to ensure it has access to the initial values.
const slug = post._raw.flattenedPath.split('/')[1];
// additional code omitted for clarity
<SWRConfig value={{fallback}}>
  <ViewCounter slug={slug} />
</SWRConfig>
Now, the ViewCounter will always show the initial value from await fetchViewCount(params?.slug);, and when it makes a request to the API route, it will also pass back the view count to the component. This allows consistent updates to be displayed in the ViewCounter.
5.5. Aggregating View Counts
As per the current setup, every time a user opens a post, the view count increments by 1, but we still need to adjust for actual user interactions with posts. This can be handled in the ViewCounter component's useEffect.
Starting with restructuring the ViewCounter component into src/components/viewCounter/index.tsx to maintain functionality.
import useSWR from 'swr';

function ViewCounter({slug}: {slug: string}) {
  const {data:view_count}=useSWR(`/api/view?slug=${slug}`);
  return <div>{`View Count: ${view_count} times`}</div>;
}

export default ViewCounter;
Next, create a function to increase the view count for the respective slug in src/lib/supabaseClient.js, utilizing the previously defined increment function.
export async function updateViewCount(slug) {
  await supabase.rpc('increment', {slug_text:slug});
}
Update the index.ts file to handle a POST request that increments the view count.
export default async function handler(
  req: NextRequest,
) {
  /* omitted code for brevity */
  const {data, error} = await fetchViewCount(slug);
  /* Increment view count during POST requests */
  if (req.method === 'POST') {
    await updateViewCount(slug);
  }

  /* Further processing */
}
Update the ViewCounter component to send a POST request to increment the view count when the component renders.
import { useEffect } from 'react';
import useSWR from 'swr';

function ViewCounter({slug}: {slug: string}) {
  const {data:view_count}=useSWR(`/api/view?slug=${slug}`);

  useEffect(() => {
    fetch(`/api/view?slug=${slug}`, {
      method: 'POST',
    });
  }, [slug]);

  return <div>{`View Count: ${view_count} times`}</div>;
}

export default ViewCounter;
This implementation would increment the view count, but activating React's strict mode led to the view count increasing by 2. In strict mode, each component is rendered twice, thus causing double increments.
Disable React strict mode in next.config.js. Note that Cloudflare Pages' Next.js builds do not support React strict mode as of now, but it's a sensible adjustment.
const { withContentlayer } = require('next-contentlayer');

/** @type {import('next').NextConfig} */
const nextConfig = {
  images: {
    unoptimized: true,
  },
  reactStrictMode: false,
  swcMinify: false,
};

module.exports = (withContentlayer(nextConfig));
5.6. Returning to Vercel from Cloudflare...
I deployed this adjusted setup, and the view counts displayed correctly. However, the counts did not update in real-time. Why? Observing the developer tools' network tab showed that while fallback counts were working well, the real-time updates weren't happening.
SWR doesn’t seem to work effectively under Cloudflare. Dealing with a multitude of issues and trying various data-fetching methods, I eventually concluded that achieving real-time updates in edge runtime is nearly impossible, leading me back to using Vercel.
6. Redeploying to Vercel
6.1. Registering the Supabase Key
Having chosen to continue using Supabase, it is functional and a more generous free plan is available compared to Firebase.
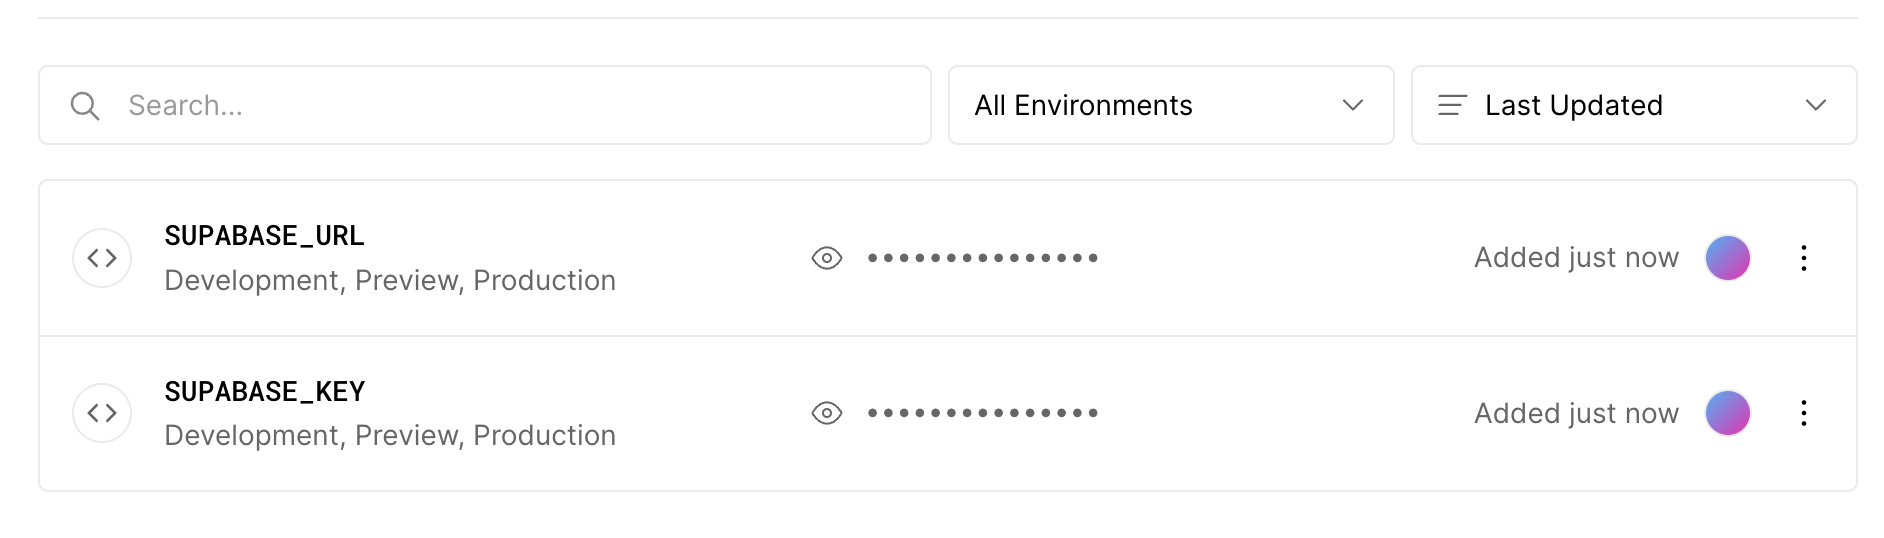
Go into your Vercel project settings, and under Environment Variables, add the SUPABASE_URL and SUPABASE_KEY created earlier.
6.2. Rewriting the Files
The src/lib/supabaseClient.js file does not require immediate changes.
The api/view/index.ts can be rewritten more concisely using NextApiResponse.
// src/pages/api/view/index.ts
import { NextApiRequest, NextApiResponse } from 'next';

import { fetchViewCount, updateViewCount } from '../../../lib/supabaseClient';

export default async function handler(
  req: NextApiRequest,
  res: NextApiResponse
) {
  const slug = req.query?.slug?.toString();

  if (!slug) {
    return res.status(400).json({error: 'invalid slug in query string'});
  }

  if (req.method === 'POST') {
    await updateViewCount(slug);
  }

  const {data, error} = await fetchViewCount(slug);

  if (error) {
    return res.status(500).json({error});
  }
  return res.status(200).json({view_count:data?.view_count || 0});
}
The ViewCounter component will be simplified as follows.
// src/components/viewCounter/index.tsx
import { useEffect } from 'react';
import useSWR from 'swr';

const fetcher = async (input: RequestInfo) => {
  const res: Response = await fetch(input);
  return await res.json();
};

function ViewCounter({slug}: {slug: string}) {
  const {data}=useSWR(`/api/view/${slug}`, fetcher);

  useEffect(() => {
    fetch(`/api/view/${slug}`, {
      method: 'POST',
    });
  }, [slug]);

  return (
    <div>
      {`View Count: ${data?.view_count ?? '---'} times`}
    </div>
  );
}

export default ViewCounter;
With these updates, the view counts can be accurately fetched and displayed for each post.
7. Styling the ViewCounter
Let’s add some styling to the ViewCounter. First, set the font size to 1.25rem. Since this is simple, I’ll skip detailing that.
Next, align it with the post date, adding a thin gray line between the date and view count.
Within src/pages/posts/[category]/[slug]/index.tsx, structure the component around ViewCounter like this.
// src/pages/posts/[category]/[slug]/index.tsx
<div className={styles.infoContainer}>
  <time className={styles.time} dateTime={toISODate(dateObj)}>
    {formatDate(dateObj)}
  </time>
  <div className={styles.line}></div>
  <ViewCounter slug={slug} />
</div>
Styling for each component can be added straightforwardly.
// src/pages/posts/[category]/[slug]/styles.module.css
.infoContainer {
  display: grid;
  grid-template-columns: auto 1fr auto;
  margin-bottom: 0.5rem;
}

.line {
  margin: auto 0.5rem;
  border: 1px solid var(--gray1);
  height: 0;
}
This approach aligns the view count with the date while allowing for real-time updates. It appears that not using fallback values is crucial for real-time functionality.
References
[Blog Links and Resources]
- https://curryyou.tistory.com/508
- https://mnxmnz.github.io/nextjs/google-analytics/
- https://ha-young.github.io/2020/gatsby/Add-Google-Analytics/
- _document.js - https://nextjs.org/docs/pages/building-your-application/routing/custom-document
- _app.js - https://nextjs.org/docs/pages/building-your-application/routing/custom-app
- https://dev.to/ahmedmohmd/difference-between-appjs-and-documentjs-files-in-nextjs-3ah2
- GA for view counts: https://arturocampos.dev/blog/nextjs-with-google-analytics
- https://nextjs.org/docs/messages/next-script-for-ga
- https://mariestarck.com/add-google-analytics-to-your-next-js-application-in-5-easy-steps/
- Real-time views: https://leerob.io/blog/real-time-post-views
- https://bepyan.github.io/blog/nextjs-blog/5-google-analytics
- Counting views with Firebase: https://andresrodriguez.dev/blog/count-blog-post-views-with-firebase
- API routes documentation: https://nextjs.org/docs/pages/building-your-application/routing/api-routes
- View counting with Supabase: https://dev.to/100lvlmaster/adding-view-count-to-your-nextjs-blog-55lj
- Using SWR with Next.js: https://swr.vercel.app/ko/docs/with-nextjs
- Supabase functions documentation: https://supabase.com/docs/reference/javascript/introduction
- Improving developer experience: https://supabase.com/blog/improved-dx
- General guide on page views with Supabase: https://codebycorey.com/blog/page-views-nextjs-supabase